


Game Design with ILIAS - Level
Graphical implementation of player levels
1 Basic idea
In many games, players can further develop their characters. The so-called stats (statistics) indicate in which areas characters are already well developed. In games, these are often life and defense points, magic abilities or ranges. Better stats go hand in hand with a higher probability of success and can condition the mastery of difficult challenges.
In learning environments, this aspect can be addressed by relating learning materials to competencies.
As you have already experienced, the availability of an object can be linked to certain preconditions. In the learning objectives-driven course view, this mechanic is also picked up automatically. However, it is also possible for you to visually design your course yourself so that the learning environment fits well with your game.

The basic idea is that when a precondition is met, for example passing a test, a loading bar is filled. Unlike the learning goal-oriented course, however, in the procedure described here you can also link other availability settings or preconditions to the filling of the loading bar.
The fuller the loading bar, the more skills you have developed in that skill area. Also feel free to look at the example folder. Essentially, it's about using a feature of the page editor that allows you to mesh blocks with the preconditions of objects. In the edit mode of a block, at the very bottom, you can time the availability of a block, but also tie it to the permissions for a particular object.
Learn here step by step how to create such player stats in the form of loading bars in the ILIAS page editor:


back to the overview "Levels in Games and in Teaching"
2 Creating the loading bars
Creating the frame
In order to see a beginning and an end of a loading bar, a block with a shaded border is created (in the example "statsframe"). To do this, go to the Style menu and create a section format that suits your taste. In the example, a block was created with the frame type "inset". Further settings were not adjusted.
Creating the bar itself
For the successively appearing fill it still needs a block format which has no inner space or outer margin, so that there are no gaps between the individual fill images. For this purpose, a second section format was inserted into the stylesheet, which is characterized only by the fact that there are no margins.
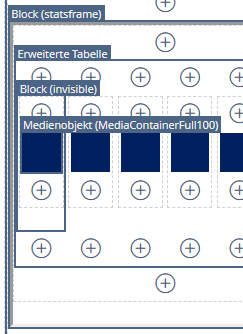
The color fill consists of square frames. You can easily create these yourself by drawing a colored square in a graphics program and saving it as an image (also works in PowerPoint). This image is then inserted into the invisible block. By default, images are inserted into so-called media blocks. Select in the style editor, in the tab "Media" a media container and reduce there the outer margin and inner spacing to zero. Then assign the appropriate media block to your colored square images (in the example MediaContainerFull100).
TIP: When you create the invisible block and fill it with the image, you can simply copy the entire invisible block including the square image. For one thing, this is faster to create, and if you decide to change the color later, you can replace all the squares at once by swapping the image in the first block because the copies reference the same media object.
--> But this step will apply to all image media containers you created by copying and all media containers still in your templates, because the same media object is used in all places. In this respect it is recommended to create the units for each course anew to avoid unwanted side effects.
Using a table for the bar
Within the frame, an extended table was created. For each development step there was a column, in the example 6 columns, with one row. The margins for the table were set to 0 to make them invisible. An invisible block was now placed in each column.
The column layout is preferable to the table in most cases. Especially layout should not be done with tables, because it makes it very poorly displayed on mobile devices. However, the very flexible size of a column layout is not conducive to the loading bar. The image will always take the full width of the column layout, so a very large square would become a narrower and narrower rectangle if you used a column layout instead of a table. However, in combination with a column layout around the table, you can still achieve a good mobile display.

3 Connection with tests
After the structure has been created, the invisible blocks are interlocked with the visibility of the respective objects. That means: You have to create the objects (in the example tests) first. Then you select the first block and determine the permission object. Then select an access (in the example read access, which is also the default). This is how you proceed for each block.
Visibility of the tests
So that the bar is not full from the beginning, the visibility of the objects must still be regulated. In the preconditions you can switch the objects belonging to a competence one after the other. In the same menu you can also set that objects (in the example tests) are only visible when they are available.
Basically, the update of the loading bar should be linked to steps that are transparent for the learners in order to implement the aspect of immediate feedback as successfully as possible.
Further possibilities
The approach presented here can be applied to numerous other scenarios:
- Create an area in the course where learners can collect items
- Allow a puzzle or map to be created successively
- Design your own badges
Furthermore, the same applies to the availability of blocks as to the preconditions of objects. You can interleave the following preconditions with the availability of a block:
- Pass/fail a test
- Pass/fail a survey
- Pass/fail an exercise
back to the overview